“Use it till you wear it out”, they say. When it comes to convenience, using your stuff to the fullest is the way to go. And it’s especially interesting when you can use your old dresser as a hutch for your pet rabbit instead of throwing it away.
Old dressers can be annoying if it’s taking up space. But if you can use it as a replacement for another tool you would buy eventually, where’s the wait? Such a situation becomes the perfect bait for making a hutch out of a dresser just for your loving pet rabbit.

That’s exactly why we’ve covered all the points on how to turn a dresser into a rabbit hutch. Don’t worry; you’ll get a step-by-step guideline in this article through which you can do all the work by yourself.
Why Do Rabbits Need a Hutch?

Just the way we need a roof as a basic requirement, rabbits need a Hutch as a way of their comfort. To have healthy growth, rabbits must have a safe space where they can make their habitat.
This type of environment is specifically necessary as rabbits tend to be very fragile. Running, hiding, sleeping, etc, is in their regular routines, which they actively follow as a part of living.
It becomes difficult to make an environment more adaptable like that of mother nature than when it comes to keeping your pet rabbits indoors. And that’s a big part of why hutch is a necessity for rabbits.
Besides their nature, hutches protect rabbits from mosquitoes, insects and prevent bugs that can infect your rabbits. Especially for indoor rabbits, hutches prove to be a beneficial commodity. Hutches are, in fact, a house your rabbit needs.
Why Choose a Dresser as a Hutch?
Essentially a dresser is a perfect ripoff of a hutch. Usually, in hutches, there are different layers for rabbits to reside. Dressers have similar kinds of layers that match a hutch.
With some creative DIY and crafty touches, it is possible to convert a dresser entirely into a hutch without additional hassle.
That’s not it. A dresser resembles a hutch best for its durability. This is one of the vital reasons why a person opts for furniture.
Since dressers are made with hardwood and premium wood like oak, it’s unlikely that a dresser isn’t durable. Thus, as a dresser is a long-lasting tool, it’s a perfect replacement for a hutch.
Besides for DIY lovers, dressers deem to be a fun material as there are loads of scopes to apply custom designs. Not only is a dresser easy to assemble but it’s also super convenient for a person on a budget. You can’t go wrong by trying to modify a dresser into a hutch.
How to Turn a Dresser Into a Rabbit Hutch?
Let’s walk you through the steps of a very easy procedure. But before we hop into the process of reconstructing a dresser into a hutch there is some equipment you need to gather.
Things You Need:
- A dresser
- Hinges and latches
- Sanding essentials
- Handles and plywood pieces
- Wire cutters and wire cloth
- Shelf paper
- Fabric liners
Once you’ve gathered these pieces, you’re good to go.
The Procedure:
Step 1: Planning and Measurement
The first and foremost thing you should do is make a plan and decide if you’d like to customize it differently. Planning is key if you want the work to finish faster. After you’re done with planning, start taking measurements.
Measure the corners, order, patterns, and linings that you will start with. You must take the measurements of all ends and decide where to craft.
It’s ideal if you start with the top shelf of the dresser, as you’ll need to cut holes to make a ramp between each layer. Don’t forget to take measurements properly if you want to build doors, ramps and create new units.
Step 2: Sanding
Sanding the dresser is essential for a smooth and glossy varnish. Start by removing the old stains and varnish by sanding the dresser accordingly. The rubbing will require sandpaper according to the level of coarseness.
If your dresser is pretty old and shaggy, you’ll need different gritty sandpapers for removing the old stain. It might be 40 to 80 to even 120 grit paper. The more gritty sandpaper you use, the smoother the surface.
Once you’ve taken your sandpaper, start rubbing the entire dresser from one corner to another. This will smoothen every corner of the dresser, including the inner and outer layers.
Step 3: Reassemble
If you feel like you need to make any structural changes, now’s the chance. Like filling up extra holes or damaged edges. You can even remove the additional shelves and even keep them if it suits your taste.
But removable shelf options most certainly come in handy. This helps you decide according to the situation whenever you want—like, taking out the shelves from fine to time for more space and air. No matter the adjustment, make sure you do it right away.
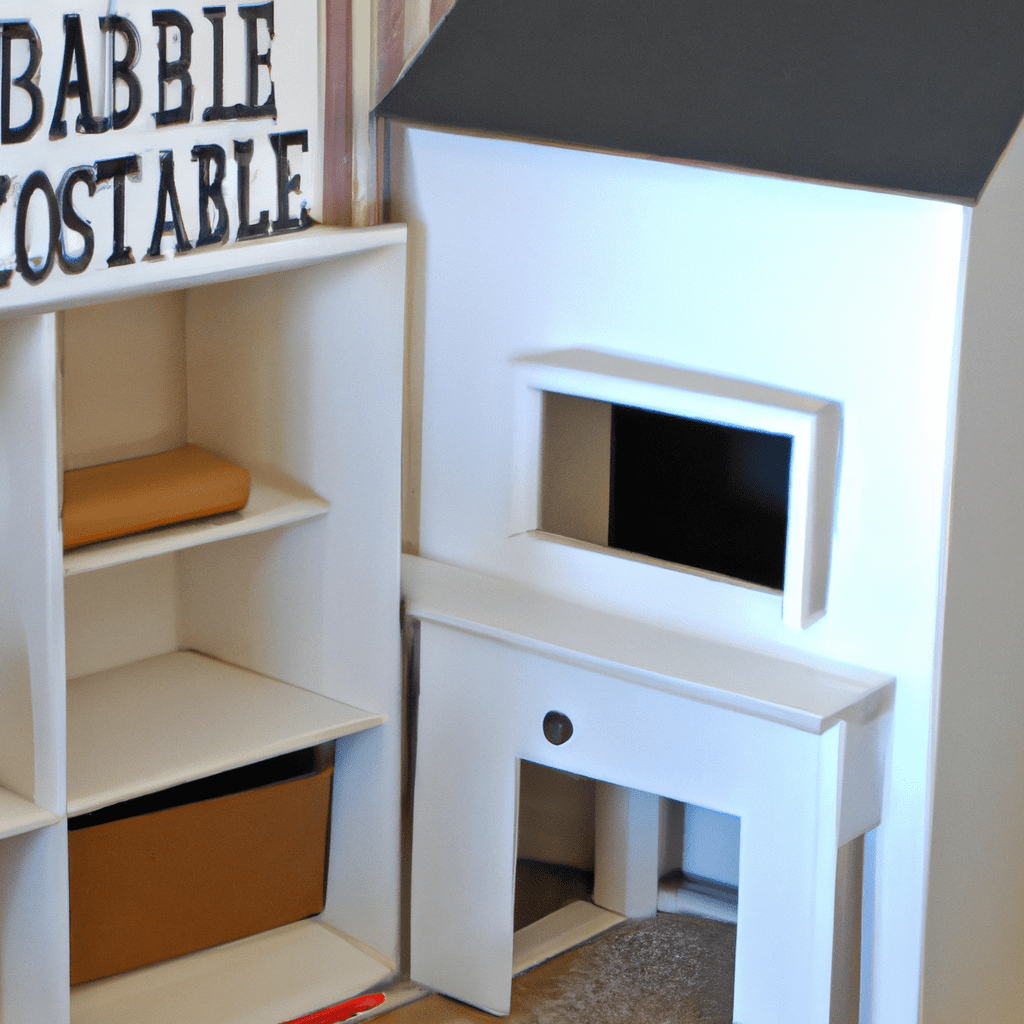
Step 4: Crafting the Ramps
Time for ladders! That’s right. Ramps work like a ladder for your bunnies to climb up and go down any time. To make a ramp, take plywood and make a triangle shape by trimming thin lines.
Keep trimming based on how many ramps you want. Remember to keep the height in check. If the ramps are too high, your bunnies won’t be able to climb or go down. It’s better to make the ramps moderate so that all types of bunnies can move back and forth.
Besides, it’s ideal to use adhesive instead of id nails as they can harm your rabbits.
Step 5: Constructing the Doors
Constructing doors alone might come off as a hassle. But there’s an easy method. For people doing this alone, choosing a panel door type design is ideal. This method is much easier than other methods.
After measuring the front side of the dresser, start to trim the outlines of the doors and slowly cut the doors from the middle from the hardwood. Next, take the hinges and brackets to relocate the doors to the respective corners of the hutch. You can use locks if you want to.
Step 6: Using Contact Paper
To protect the wooden interior from breaking apart, cover the whole dresser with contact paper. You can use secondary contact papers if you’d like the dresser to be waterproof. Either way, this layering of contact paper will protect the wooden furniture from erosion.
Step 7: Decoration
Lastly, decorate it as you must. Paint with any colors you like. It’s a better option to paint rather than not painting at all as it makes the hutch look more compact.
Don’t forget to decorate this new hutch with rabbit toys like beds, litter, and food cans.
After you’ve decorated it, there you have it. A proper DIY hutch for your bunnies.
Frequently Asked Questions
- Is it cruel to keep rabbits in a hutch?
Rabbits are fragile creatures that are prone to dangers when kept in the wild. But that’s their natural habitat.
As much as it is cruel to keep them in a hutch to some extent, it’s also proved to be an advantage since they’re safer when kept indoors. What matters is if they’re safe and living.
- What woods are safe for rabbits?
Usually, Willow wood is always deemed safe when it comes to rabbits. Other than that, Apple and pear trees, poplar and birch trees, maple trees, rose bush trees, and cottonwood are also safe for all types of rabbits.
Besides, the infamous kiln-dried aspen is especially recommended for rabbits as it can be used as a litter material for its absorptive properties.
- How much does it cost to build a rabbit hutch?
DIY rabbit hutches are always cost-effective. They can be created with upcycled materials and old equipment that lie around here and there. Plus, they’re pretty easy to reconstruct as well.
Depending on the type of equipment you need, it can cost from $60 to more than $300 – it varies from person to person.
- What do rabbits need in their cage?
For healthy growth, rabbits will need several things. There should be enough room for the rabbits to go back and forth. To move from upper surface to lower surface, they’ll need ramps. Other than that, a litter box and water pot should also be available.
It’s ideal if there’s a barrier in front of the doors so that they can come and go by themselves.
Final Words
Providing a comfortable space to your pet is essential as they give us comfort. And who doesn’t like a man cave of his own? Be it us or a little bunny; every living being seeks comfort.
There could be no other better reason to know how to turn a dresser into a rabbit hutch other than this. Hence, take all the tips and tricks from this post so that you’re able to build a hefty and beautiful hutch for your pet bunny by yourself.
Meta DescriptionIf you’re short in cash and wondering how to turn a dresser into a rabbit hutch, which is perfect for getting a cheap rabbit cage, you’re in the right spot.
Known for her engaging storytelling and insightful articles,John's hamster blog has become a go-to resource for hamster lovers everywhere. Her ability to blend knowledge, creativity, and a touch of humor has earned her a loyal following of readers who eagerly anticipate her next post.
John's love for hamsters began in her childhood when she received her first pet hamster, Whiskers. Ever since that fateful day, her fascination with these tiny furballs has grown into a full-fledged obsession. She spends countless hours researching, experimenting, and observing hamster behavior to ensure that her writing is always backed by solid knowledge and firsthand experiences.
Through her blog,John strives to educate fellow hamster owners on the importance of providing proper care and a nurturing environment for these small creatures. She covers a wide range of topics, from choosing the right hamster species and setting up the perfect habitat to nutrition, health, and behavior training. Her tips and tricks are practical and easy to follow, ensuring that every hamster owner can give their pet the love and care it deserves.
John's writing not only caters to hamster enthusiasts but also serves as a valuable resource for those considering bringing a hamster into their lives. Her articles provide an in-depth understanding of the responsibilities and Joys of hamster ownership, helping prospective owners make informed decisions.
WhenJohn isn't busy writing or tending to her furry companions, she can often be found volunteering at local animal shelters and hamster rescue organizations. She firmly believes in the power of community and hopes to make a positive impact on the lives of as many hamsters as possible.
John's dedication to the well-being of hamsters and her ability to communicate her knowledge with passion and clarity have made her a respected authority in the hamster community. Her blog continues to inspire and educate, creating a stronger bond between humans and their adorable hamster friends.
FollowJohn on her hamster blog to embark on an exciting Journey into the world of hamsters, where love, care, and happiness come together to create unforgettable experiences.
- Out-Of-The-Box Wonders: Unveiling The World Of Creative Hamster Cages - April 20, 2024
- Beyond Pets: Hamsters As Cultural Critters In Modern Society - April 20, 2024
- Gut Instincts: Understanding Hamster Digestive Questions And Concerns - April 20, 2024